はじめに
業務で使用しているZabbixサーバをリプレースする為、Zabbix Server 6.0を構築します。
検証環境
Zabbix Serverの構成は、下記の通り。
| 仮想環境 | OS | Rocky Linux 8.7 |
| ホスト名 | rocky8-01.local | |
| IPアドレス | 192.168.0.150 | |
| Zabbix Server | Zabbix Serverバージョン | 6.0.13 |
| Apache | Apcheバージョン | 2.4.37 |
| MySQL | MySQLバージョン | 8.0.30 |
| rootユーザのパスワード | rootp@sswd | |
| zabbixデータベース名 | zabbix | |
| zabbix用ユーザ | zabbix@localhost | |
| zabbix用ユーザのパスワード | zabbixp@sswd |
作業内容
Apacheインストール
(1) Apacheをインストールします。
# dnf -y install httpd

 …省略…

インストール済み:
  apr-1.6.3-12.el8.x86_64                                    apr-util-1.6.1-6.el8.1.x86_64
  apr-util-bdb-1.6.1-6.el8.1.x86_64                          apr-util-openssl-1.6.1-6.el8.1.x86_64
  httpd-2.4.37-51.module+el8.7.0+1059+126e9251.x86_64        httpd-filesystem-2.4.37-51.module+el8.7.0+1059+126e9251.noarch
  httpd-tools-2.4.37-51.module+el8.7.0+1059+126e9251.x86_64  mailcap-2.1.48-3.el8.noarch
  mod_http2-1.15.7-5.module+el8.6.0+823+f143cee1.x86_64      rocky-logos-httpd-86.3-1.el8.noarch

完了しました!
※サービス起動設定は、後続の手順で実施します。
MySQLインストール
(1) MySQLをインストールします。
# dnf -y install mysql-server

 …省略…

インストール済み:
  checkpolicy-2.9-1.el8.x86_64                                libicu-60.3-2.el8_1.x86_64
  mariadb-connector-c-config-3.1.11-2.el8_3.noarch            mecab-0.996-2.module+el8.6.0+1057+4d6a1721.x86_64
  mysql-8.0.30-1.module+el8.6.0+1057+4d6a1721.x86_64          mysql-common-8.0.30-1.module+el8.6.0+1057+4d6a1721.x86_64
  mysql-errmsg-8.0.30-1.module+el8.6.0+1057+4d6a1721.x86_64   mysql-server-8.0.30-1.module+el8.6.0+1057+4d6a1721.x86_64
  perl-Carp-1.42-396.el8.noarch                               perl-Data-Dumper-2.167-399.el8.x86_64
  perl-Digest-1.17-395.el8.noarch                             perl-Digest-MD5-2.55-396.el8.x86_64
  perl-Encode-4:2.97-3.el8.x86_64                             perl-Errno-1.28-421.el8.x86_64
  perl-Exporter-5.72-396.el8.noarch                           perl-File-Path-2.15-2.el8.noarch
  perl-File-Temp-0.230.600-1.el8.noarch                       perl-Getopt-Long-1:2.50-4.el8.noarch
  perl-HTTP-Tiny-0.074-1.el8.noarch                           perl-IO-1.38-421.el8.x86_64
  perl-IO-Socket-IP-0.39-5.el8.noarch                         perl-IO-Socket-SSL-2.066-4.module+el8.6.0+957+15d660ad.noarch
  perl-MIME-Base64-3.15-396.el8.x86_64                        perl-Mozilla-CA-20160104-7.module+el8.6.0+965+850557f9.noarch
  perl-Net-SSLeay-1.88-2.module+el8.6.0+957+15d660ad.x86_64   perl-PathTools-3.74-1.el8.x86_64
  perl-Pod-Escapes-1:1.07-395.el8.noarch                      perl-Pod-Perldoc-3.28-396.el8.noarch
  perl-Pod-Simple-1:3.35-395.el8.noarch                       perl-Pod-Usage-4:1.69-395.el8.noarch
  perl-Scalar-List-Utils-3:1.49-2.el8.x86_64                  perl-Socket-4:2.027-3.el8.x86_64
  perl-Storable-1:3.11-3.el8.x86_64                           perl-Term-ANSIColor-4.06-396.el8.noarch
  perl-Term-Cap-1.17-395.el8.noarch                           perl-Text-ParseWords-3.30-395.el8.noarch
  perl-Text-Tabs+Wrap-2013.0523-395.el8.noarch                perl-Time-Local-1:1.280-1.el8.noarch
  perl-URI-1.73-3.el8.noarch                                  perl-Unicode-Normalize-1.25-396.el8.x86_64
  perl-constant-1.33-396.el8.noarch                           perl-interpreter-4:5.26.3-421.el8.x86_64
  perl-libnet-3.11-3.el8.noarch                               perl-libs-4:5.26.3-421.el8.x86_64
  perl-macros-4:5.26.3-421.el8.x86_64                         perl-parent-1:0.237-1.el8.noarch
  perl-podlators-4.11-1.el8.noarch                            perl-threads-1:2.21-2.el8.x86_64
  perl-threads-shared-1.58-2.el8.x86_64                       policycoreutils-python-utils-2.9-20.el8.noarch
  protobuf-lite-3.5.0-15.el8.x86_64                           python3-audit-3.0.7-4.el8.x86_64
  python3-libsemanage-2.9-9.el8_6.x86_64                      python3-policycoreutils-2.9-20.el8.noarch
  python3-setools-4.3.0-3.el8.x86_64

完了しました!
(2) MySQLサービスの自動起動を有効にして、サービスを起動します。
# systemctl enable --now mysqld.service
Created symlink /etc/systemd/system/multi-user.target.wants/mysqld.service → /usr/lib/systemd/system/mysqld.service
(3) MySQLサービスの稼働を確認します。
# systemctl status mysqld.service
● mysqld.service - MySQL 8.0 database server
   Loaded: loaded (/usr/lib/systemd/system/mysqld.service; enabled; vendor preset: disabled)
   Active: active (running) since Mon 2023-02-06 09:48:03 EST; 29s ago
(4) MySQLサービスの自動起動設定の確認します。
# systemctl is-enabled mysqld
enabled
(5) MySQLの初期設定を行います。
# mysql_secure_installation

Securing the MySQL server deployment.

Connecting to MySQL using a blank password.

VALIDATE PASSWORD COMPONENT can be used to test passwords
and improve security. It checks the strength of password
and allows the users to set only those passwords which are
secure enough. Would you like to setup VALIDATE PASSWORD component?

Press y|Y for Yes, any other key for No: y    ←「y」を入力

There are three levels of password validation policy:

LOW    Length >= 8
MEDIUM Length >= 8, numeric, mixed case, and special characters
STRONG Length >= 8, numeric, mixed case, special characters and dictionary                  file

Please enter 0 = LOW, 1 = MEDIUM and 2 = STRONG: 0    ←「0」を入力
Please set the password for root here.

New password:********    ←rootのパスワードを入力

Re-enter new password:********    ←rootのパスワードを入力

Estimated strength of the password: 50
Do you wish to continue with the password provided?(Press y|Y for Yes, any other key for No) : y    ←「y」を入力
By default, a MySQL installation has an anonymous user,
allowing anyone to log into MySQL without having to have
a user account created for them. This is intended only for
testing, and to make the installation go a bit smoother.
You should remove them before moving into a production
environment.

Remove anonymous users? (Press y|Y for Yes, any other key for No) : y    ←「y」を入力
Success.


Normally, root should only be allowed to connect from
'localhost'. This ensures that someone cannot guess at
the root password from the network.

Disallow root login remotely? (Press y|Y for Yes, any other key for No) : y    ←「y」を入力
Success.

By default, MySQL comes with a database named 'test' that
anyone can access. This is also intended only for testing,
and should be removed before moving into a production
environment.


Remove test database and access to it? (Press y|Y for Yes, any other key for No) : y    ←「y」を入力
 - Dropping test database...
Success.

 - Removing privileges on test database...
Success.

Reloading the privilege tables will ensure that all changes
made so far will take effect immediately.

Reload privilege tables now? (Press y|Y for Yes, any other key for No) : y    ←「y」を入力
Success.

All done!
Zabbixインストール
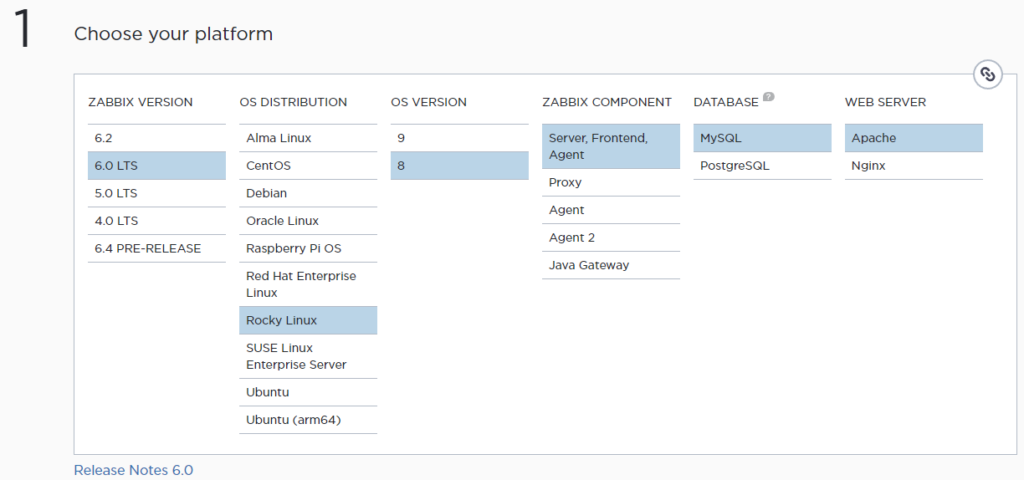
(2) 「Download and install Zabbix」ページでサーバ構成を選択します。

(3) Zabbixリポジトリをインストールします。
# rpm -Uvh https://repo.zabbix.com/zabbix/6.0/rhel/8/x86_64/zabbix-release-6.0-4.el8.noarch.rpm

(4) Zabbix Server及び、Zabbix Agentパッケージ等をインストールします。
# dnf -y install zabbix-server-mysql zabbix-web-mysql zabbix-apache-conf zabbix-sql-scripts zabbix-selinux-policy zabbix-agent

 …省略…

インストール済み:
  OpenIPMI-libs-2.0.31-3.el8.x86_64                                dejavu-fonts-common-2.35-7.el8.noarch
  dejavu-sans-fonts-2.35-7.el8.noarch                              fontconfig-2.13.1-4.el8.x86_64
  fontpackages-filesystem-1.44-22.el8.noarch                       fping-3.16-1.el8.x86_64
  gd-2.2.5-7.el8.x86_64                                            jbigkit-libs-2.1-14.el8.x86_64
  libX11-1.6.8-5.el8.x86_64                                        libX11-common-1.6.8-5.el8.noarch
  libXau-1.0.9-3.el8.x86_64                                        libXpm-3.5.12-9.el8_7.x86_64
  libjpeg-turbo-1.5.3-12.el8.x86_64                                libtiff-4.0.9-26.el8_7.x86_64
  libtool-ltdl-2.4.6-25.el8.x86_64                                 libwebp-1.0.0-5.el8.x86_64
  libxcb-1.13.1-1.el8.x86_64                                       libxslt-1.1.32-6.el8.x86_64
  mariadb-connector-c-3.1.11-2.el8_3.x86_64                        net-snmp-libs-1:5.8-25.el8_7.1.x86_64
  nginx-filesystem-1:1.14.1-9.module+el8.4.0+542+81547229.noarch   php-bcmath-7.2.24-1.module+el8.4.0+413+c9202dda.x86_64
  php-common-7.2.24-1.module+el8.4.0+413+c9202dda.x86_64           php-fpm-7.2.24-1.module+el8.4.0+413+c9202dda.x86_64
  php-gd-7.2.24-1.module+el8.4.0+413+c9202dda.x86_64               php-json-7.2.24-1.module+el8.4.0+413+c9202dda.x86_64
  php-ldap-7.2.24-1.module+el8.4.0+413+c9202dda.x86_64             php-mbstring-7.2.24-1.module+el8.4.0+413+c9202dda.x86_64
  php-mysqlnd-7.2.24-1.module+el8.4.0+413+c9202dda.x86_64          php-pdo-7.2.24-1.module+el8.4.0+413+c9202dda.x86_64
  php-xml-7.2.24-1.module+el8.4.0+413+c9202dda.x86_64              unixODBC-2.3.7-1.el8.x86_64
  zabbix-agent-6.0.13-release1.el8.x86_64                          zabbix-apache-conf-6.0.13-release1.el8.noarch
  zabbix-selinux-policy-6.0.13-release1.el8.x86_64                 zabbix-server-mysql-6.0.13-release1.el8.x86_64
  zabbix-sql-scripts-6.0.13-release1.el8.noarch                    zabbix-web-6.0.13-release1.el8.noarch
  zabbix-web-deps-6.0.13-release1.el8.noarch                       zabbix-web-mysql-6.0.13-release1.el8.noarch

完了しました!
(5) 初期Zabbixデータベースを作成します。
# mysql -u root -p
Enter password:********    ←rootパスワード

### 1. Zabbixデータベース作成
mysql> create database zabbix character set utf8mb4 collate utf8mb4_bin;
Query OK, 1 row affected (0.00 sec)

### 2. MySQLアカウント作成(ユーザー:zabbix, パスワード:任意)
mysql> create user zabbix@localhost identified by 'zabbixp@sswd';
Query OK, 0 rows affected (0.01 sec)

### 3. zabbixユーザに全ての権限を付与
mysql> grant all privileges on zabbix.* to zabbix@localhost;
Query OK, 0 rows affected (0.00 sec)

### 4. 一時的にバイナリロギングを有効化
mysql> set global log_bin_trust_function_creators = 1;
Query OK, 0 rows affected (0.00 sec)

### 5. MySQL終了
mysql> quit;
Bye
(6) 初期スキーマとデータをインポートします。
# zcat /usr/share/zabbix-sql-scripts/mysql/server.sql.gz | mysql --default-character-set=utf8mb4 -uzabbix -p zabbix
Enter password:********    ←zabbixパスワード
(7) バイナリロギングを無効化します。
# mysql -u root -p
Enter password:********    ←rootパスワード

### 1. バイナリロギングを無効化
mysql> set global log_bin_trust_function_creators = 0;
Query OK, 0 rows affected (0.00 sec)

### 2. バイナリロギングの設定値確認
mysql> SHOW VARIABLES LIKE 'log_bin_trust_function_creators';
+---------------------------------+-------+
| Variable_name                   | Value |
+---------------------------------+-------+
| log_bin_trust_function_creators | OFF   |
+---------------------------------+-------+
1 row in set (0.00 sec)

### 3. MySQL終了
mysql> quit;
Bye
(8) zabbix_serverの設定ファイルを編集します。
# sed -i".org" -e "s/\(# DBPassword=$\)/\1\nDBPassword=zabbixp@sswd/g" /etc/zabbix/zabbix_server.conf(9) zabbix_serverの設定ファイルの変更を確認をします。
# diff /etc/zabbix/zabbix_server.conf /etc/zabbix/zabbix_server.conf.org
130d129
< DBPassword=zabbixp@sswd
(10) Zabbix関連のサービス再起動し、サービス自動起動設定を有効化します。
# systemctl restart zabbix-server zabbix-agent httpd php-fpm
# systemctl enable zabbix-server zabbix-agent httpd php-fpm
Created symlink /etc/systemd/system/multi-user.target.wants/zabbix-server.service → /usr/lib/systemd/system/zabbix-server.service.
Created symlink /etc/systemd/system/multi-user.target.wants/zabbix-agent.service → /usr/lib/systemd/system/zabbix-agent.service.
Created symlink /etc/systemd/system/multi-user.target.wants/httpd.service → /usr/lib/systemd/system/httpd.service.
Created symlink /etc/systemd/system/multi-user.target.wants/php-fpm.service → /usr/lib/systemd/system/php-fpm.service.
OSファイアウォール設定
(1) firewallでhttpのアクセスを許可して、リロード(反映)します。
# firewall-cmd --zone=public --add-service=http --permanent
success

# firewall-cmd --reload
success
(2) firewallの設定を確認します。
# firewall-cmd --list-all
public (active)
  target: default
  icmp-block-inversion: no
  interfaces: eth0
  sources:
  services: cockpit dhcpv6-client http ssh
  ports:
  protocols:
  forward: no
  masquerade: no
  forward-ports:
  source-ports:
  icmp-blocks:
  rich rules:
ZabbixサーバWeb管理画面の初期設定
(1) WebブラウザでZabbixのWeb管理画面へアクセスします。
・URL:http://192.168.0.150/zabbix/
(2) [ようこそ]画面で使用する言語を選択して、[次のステップへ]をクリックします。

(3) [前提条件のチェック]画面で全て[OK]であることを確認して、[次のステップ]をクリックします。

(4) [データベース接続設定]画面でzabbixアカウントを入力して、[次のステップ]をクリックします。

(5) [設定]が画面で、[Zabbixサーバー名]を入力(任意)します。[デフォルトのタイムゾーン]で「(UTC+09:00) Asia/Tokyo」を選択して、[次のステップ]をクリックします。

(6) [インストール事前準備概要]で[次のステップ]をクリックします。

(7) [終了]をクリックします。以上で、Zabbix Serverのインストールは完了です

(8) 初期Zabbixアカウントでサインインします。
・ユーザー名: Admin
・パスワード: zabbix

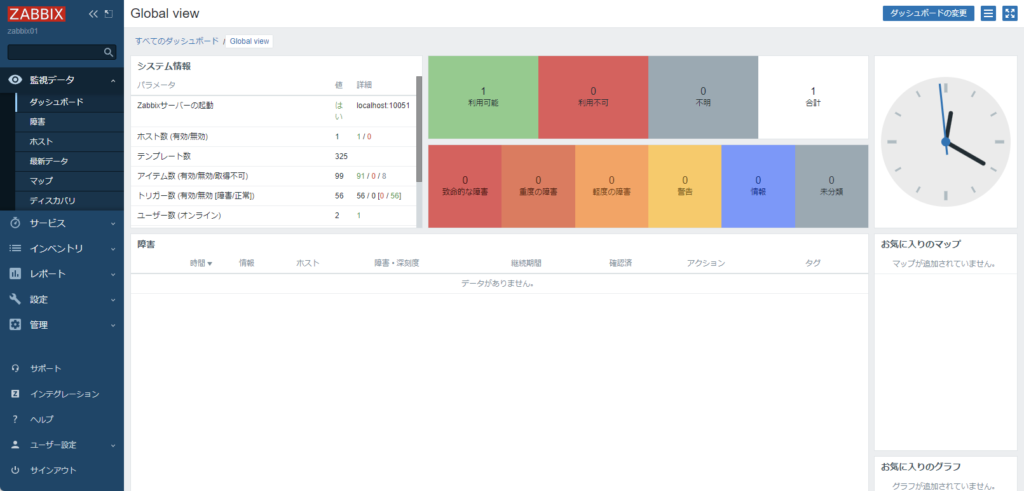
(9) サインインが完了して、初期のダッシュボード画面が表示されます。

あとがき
初期Zabbixサーバのインストールまで完了しましたので、次回以降はZabbixの設定をしていきたいと思います。


コメント